Taylor Made Awnings Installation Instructions

Awning Installation Instructions Taylormadeawning Com

Taylor Made Awnings Reviews Retractableawningsreviews Com

Taylor Made Retractable Awning 12 W X 8 2 L R Manual Sunbrella Walnut Brn Twd Buy Online In Cayman Islands Taylor Made Awnings Products In Cayman Islands See Prices Reviews And
Taylor Made Retractable Awning 16 W X 10 L L Manual Sunbrella Putty Regimental Buy Online In Dominica Taylor Made Awnings Products In Dominica See Prices Reviews And Free Delivery Over

Retractable Awnings Deck Patio Awnings For Your Home

Patio Awnings Outdoor Awnings Residential Awning Canvas And Fabric Taylormadeawning Com

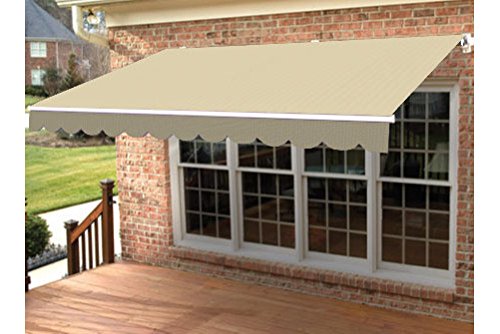
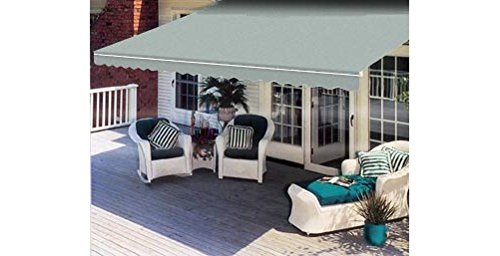
Retractable awnings taylor made presents the preferred choice in high quality retractable awnings favored by installers and do it yourselfers for durability and easy installation.
Taylor made awnings installation instructions.

Dometic 8500 Manual Awning 848
Taylor Made Retractable Awning 15 W X 10 Buy Online In Cayman Islands At Desertcart

Box Awning Camabox Bx4000 Stobag Retractable Manual Motorized

Outsunny 12 X 8 2 Outdoor Patio Manual Retractable Exterior Window Awning Wine Red Large Retractable Awning Aosom Com In 2020 Outdoor Awnings Windows Exterior Pergola Outdoor Living

Pike Properties On Instagram Ahhh The Details Standing Seam Metal Wind In 2020 Metal Awnings For Windows Exposed Rafters Window Awnings

Tentes Sthn A8hna Apo Thn Etaireia Gkikas Ma8ete Perissotera Sto Https Www Tentesgikas Gr Pergoles Tenta Tentes

Manual Awning Canopy Patio Garden Sun Shade Shelter Green Rain Cover Top Fabr View More On The Link Http Ww Rain Cover Outdoor Ottoman Outdoor Blanket

Patio Manual Retractable Deck Awning Sun Shade Shelter Canopy Outdoor Outdoor Pergola Pergola Pergola Ideas For Patio

Sunstopper Sun Blocker 99 16 X 10 Ft Motorized Retractable Awning Forest White White Retractable Awning Awning Pergola

Hago 10 X 8 Patio Manual Retractable Awning Window Door Sunshade Shelter For Sale Online Ebay With Images Patio Awning Canopy Outdoor

Outsunny 8 X 7 Manual Retractable Sun Shade Patio Awning Cream Beige Outdoor Window Sunshade Shelter Easy Retractable Shade Awning Aosom Com Patio Awning Retractable Pergola Pergola Shade

Retractable Awnings All Styles Of Patio Window And Door Awnings Pergola Carport Designs Pergola Carport

Diy Awnings Retractable Over Doors Ideas Patio Awnings Front Door Awnings For Windows And For Decks Metal Indoo Carport Designs Pergola Cost Pergola Carport

Self Supporting Pergola Tailor Made R6 Falcate Goss Outdoor Painted Aluminum With Sliding Canopy Retractable

Self Supporting Pergola Tailor Made R5 Falcate Goss Outdoor Painted Aluminum Fabric Canopy Fabric Sliding Canopy

Aleko 10 Ft Motorized Retractable Awning 96 In Projection In Multi Stripe Green Awm10x8mstrgr58 Hd The Home Depot Patio Awning Retractable Awning Patio Flooring

Self Supporting Pergola Tailor Made R6 Subulate Goss Outdoor Painted Aluminum Fabric Sliding Canopy Retractable

Window Awnings In 2020 House Exterior House Design Porch Roof

Taylor Made Anchor Shade Iii Sand West Marine

Wall Mounted Pergola Tailor Made R4 Falcate Goss Outdoor Painted Aluminum Fabric Sliding Canopy Retractable
Taylor Made Acquires 80 000 Square Foot Building To Expand Distribution And Manufacturing Footprint Lippert Components Inc

Taylor Made Anchor Shade Iii Gray West Marine

Very Flexible Retractable Patio Awning Deco Home Decor In 2020 Residential Awnings Patio Patio Awning

Wall Mounted Pergola Tailor Made R4 Subulate Goss Outdoor Painted Aluminum Fabric Sliding Canopy Retractable

Lippert Components And Taylor Made To Debut Several New Marine Products At Ibex 2018 Lippert Components Inc

Diy Semi Cassette Retractable Awning Both Manual And Electrical Is Available Outdoor Awnings Polycarbonate Panels Awning

Hanging Pergola Tailor Made R2 Falcate Goss Outdoor Painted Aluminum Fabric Canopy Retractable

Taylor Made Anchor Shade Iii Blue West Marine
Lippert Components Agrees To Acquire Marine And Industrial Supplier Taylor Made Group Llc Lippert Components Inc

Deck Canopy With A Powder Coated Frame And Two White Ceiling Fans Fabricated And Installed In Downingtown By Kreid Outdoor Awnings Diy Awning Aluminum Awnings

Taylor Made Products Lippert Customer Support

Marin County Awnings Diamond Certified

Door Window Rain Cover Canopy Outdoor Awning Patio Cover Uv Rain Snow Protection Sun Shade Shelter Awning In 2020 Outdoor Awnings Canopy Outdoor Snow Protection

Diy Outdoor Awning 101 Woonideeen Outdoor Awnings Diy Patio Backyard Shade

5500 Series Roll Up Window Awning Aluminum Window Awnings Window Awnings Garage Door Design

Pin On Best Charcoal Grill Reviews

Diy Shed Awning Quick And Easy Shed With Porch Diy Awning Diy Storage Shed Plans

Retractable Awnings Arcapro1

Hoover Canvas Awning Photo Galleries And Design Ideas Canvas Awnings Deck Awnings Awning

Pin On Outdoor Bistro Set

Panorama Window Awning Custom Colors Window Awnings Aluminum Window Awnings Retro Renovation

Awnings In A Box Desinger 50 5 In Wide Solid Open Slope Window Door Awning 3020763 In 2020 Diy Awning Window Awnings Door Awnings

Gallery Awning Retractable Awning Outdoor Decor

Nuimage Awnings 4 Ft 3700 Series Fabric Window Awning 28 In H X 24 In D In Forest Vintage Bar Stripe Green
Source : pinterest.com
